# Register Account

<h3 align="center"><strong>Welcome to LevelMU Server</strong></h3>

<h3 align="center"> <strong>in this guide you will learn how to create your account.</strong></h3>

<h3 align="center">Step1: </h3>

{% hint style="info" %}

<p align="center"><strong>Press</strong> <a href="https://levelmu.net/register"><strong>register</strong></a> <strong>to be redirected and fill in your details.</strong></p>
{% endhint %}

<figure><img src="https://522801306-files.gitbook.io/~/files/v0/b/gitbook-x-prod.appspot.com/o/spaces%2FWkHrPTCMsd8do1wbyrNs%2Fuploads%2FPZS49Sb3utvdxvdpfG89%2Fimage.png?alt=media&amp;token=6feaca0a-d376-4a28-afc4-987eee4bbfe6" alt=""><figcaption></figcaption></figure>

<h3 align="center">Step2:</h3>

{% hint style="info" %}

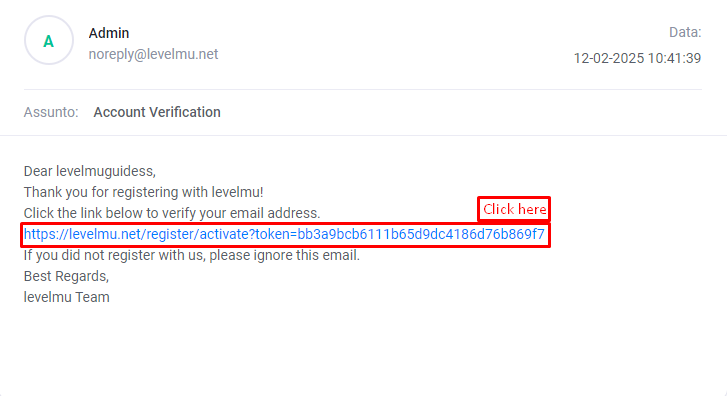
<p align="center">After filling out the form, an email will be sent to your inbox instantly</p>
{% endhint %}

<figure><img src="https://522801306-files.gitbook.io/~/files/v0/b/gitbook-x-prod.appspot.com/o/spaces%2FWkHrPTCMsd8do1wbyrNs%2Fuploads%2F5wrjzyMZQKAGznrm8Vr5%2Fimage.png?alt=media&amp;token=28804e85-e69a-403a-ae3b-ae0b2a3740a5" alt="" width="563"><figcaption></figcaption></figure>

<figure><img src="https://522801306-files.gitbook.io/~/files/v0/b/gitbook-x-prod.appspot.com/o/spaces%2FWkHrPTCMsd8do1wbyrNs%2Fuploads%2Fn8Dz8qJap3iT9msCpjvc%2Fimage.png?alt=media&amp;token=52af77dc-163c-40f9-88a9-386f20fb63f5" alt="" width="563"><figcaption></figcaption></figure>

<h3 align="center">Step3:</h3>

{% hint style="info" %}

<p align="center">You will receive a confirmation email and simply click on the link sent to confirm your account.</p>
{% endhint %}

<figure><img src="https://522801306-files.gitbook.io/~/files/v0/b/gitbook-x-prod.appspot.com/o/spaces%2FWkHrPTCMsd8do1wbyrNs%2Fuploads%2Fdv6GIZI5eQPYViqg67cw%2Fregister2.png?alt=media&amp;token=8ce378ac-cd74-4a36-b5bd-54d360c3707e" alt=""><figcaption></figcaption></figure>

<figure><img src="https://522801306-files.gitbook.io/~/files/v0/b/gitbook-x-prod.appspot.com/o/spaces%2FWkHrPTCMsd8do1wbyrNs%2Fuploads%2FrVQSWLGnXMRSqb5B4vgT%2Fimage.png?alt=media&amp;token=0903a66f-c51b-4142-9fb0-bf71ae3dbd3c" alt=""><figcaption></figcaption></figure>

{% hint style="info" %}

<p align="center">Your account has been successfully verified, <br>now log in to the user panel and access the dashboard panel</p>
{% endhint %}

<figure><img src="https://522801306-files.gitbook.io/~/files/v0/b/gitbook-x-prod.appspot.com/o/spaces%2FWkHrPTCMsd8do1wbyrNs%2Fuploads%2FgYFrF2eCZYNzxtHynenu%2Fimage.png?alt=media&amp;token=1801a2f1-2b10-45d0-9d7b-a028e08effb0" alt=""><figcaption></figcaption></figure>

{% hint style="info" %}

<p align="center">Access your dashboard to create your <strong>Sub-Account</strong> that will be used to access the game.<br>Right after your first login, you will need to create your <strong>Sub-Account</strong>; just fill it out to unlock your access to the dashboard.</p>
{% endhint %}

<figure><img src="https://522801306-files.gitbook.io/~/files/v0/b/gitbook-x-prod.appspot.com/o/spaces%2FWkHrPTCMsd8do1wbyrNs%2Fuploads%2Fdh2dOtI167gEeqSg6LX3%2Fimage.png?alt=media&amp;token=bc804d39-ea25-4cd2-bfb7-904abead718f" alt=""><figcaption></figcaption></figure>

<h3 align="center">F.A.Q</h3>

{% hint style="info" %}

<p align="center"><strong>A:</strong> Your web account is an administrative account to manage all your sub-accounts.<br><strong>B:</strong> Donations are linked to your Web Account, and you can distribute them among your sub-accounts yourself.<br><strong>C:</strong> Rewards earned on the site are stored in your web account until they are distributed to your sub-account.<br><strong>D:</strong> The web account cannot be used to access the game; it is only a management account.<br><strong>E:</strong> The Sub-Account is used to access the game.</p>
{% endhint %}


# F.A.Q Account

## Account Information:

{% hint style="info" %}
Web Account: Does not log into the game. It is used for management only.\
Sub-Account: It is used to log in to the game.
{% endhint %}

## Dashboard Information:

{% hint style="info" %}
Dashboard is a tool so you can manage all your Sub-Accounts in the same place. Including the services available on our server.
{% endhint %}

## Donate Information:

{% hint style="info" %}
Your donations are linked to your website account and the credits can be distributed by you to each Sub-Account.
{% endhint %}

## Reward Quest Web:

{% hint style="info" %}
Redeemed item rewards are sent to your Gremory Case. just press \[K] inside the game.
{% endhint %}

## Vote Reward:

{% hint style="info" %}
Rewards for votes will be sent once every 12h. Even if you try to vote more times, you will not receive a reward. We would like to thank you for your votes, this will help the server.
{% endhint %}

## Vip Information:

{% hint style="info" %}
You can buy different VIPs for your Sub-Account. With only 1 VIP at a time on different accounts, if the VIP cancels, a fee will be charged in credits for the time used and the remaining time will be refunded in credits.
{% endhint %}

## I didn't receive my credits:

{% hint style="info" %}
Credits are added automatically after payment confirmation. In case of delay in delivery, the reasons lie with your bank. Contact our Facebook/Web/Discord support and we will resolve the issue for you.
{% endhint %}

## Change Class:

{% hint style="info" %}
This service is used to change your class to any other. Items are not exchanged.
{% endhint %}

## Change Password:

{% hint style="info" %}
There are 2 types of password change.

1- Change web password for web account only. 2- Change game password only for sub-account to log in to the game.
{% endhint %}

## Change Email:

{% hint style="info" %}
This service is disabled and we will not exchange emails after registration.
{% endhint %}

### Account Settings:

{% hint style="info" %}
All management of your sub-accounts is available through your web account; switch between your sub-accounts, logs, security, etc.
{% endhint %}

<figure><img src="https://522801306-files.gitbook.io/~/files/v0/b/gitbook-x-prod.appspot.com/o/spaces%2FWkHrPTCMsd8do1wbyrNs%2Fuploads%2FfG0gle1udS5EldJ4W6Um%2Fimage.png?alt=media&amp;token=c8eee625-7327-4c1d-9213-e805b47ac55a" alt=""><figcaption></figcaption></figure>


# Discord Community

{% hint style="info" %}
Access our discord community to stay up to date with news and server updates, participate in giveaways and more\
[**Discord Community Click Here**](https://discord.gg/FPTJyzmr)
{% endhint %}


# First Steps In-Game

**Welcome to LevelMU Server, in this guide you will learn your first steps.**

<h2 align="center">How to evolve my class:</h2>

{% hint style="info" %}

<p align="center">It is not necessary to do the Marlon quest to evolve your class, just type the <mark style="color:red;">/evo command</mark> in the game chat to evolve your character's class.</p>
{% endhint %}

<figure><img src="https://522801306-files.gitbook.io/~/files/v0/b/gitbook-x-prod.appspot.com/o/spaces%2FWkHrPTCMsd8do1wbyrNs%2Fuploads%2F9daWqOz3ePQBDL1kPopy%2Fevo.png?alt=media&amp;token=53e48b72-c92d-4fe0-a04a-7308f81fbfea" alt=""><figcaption></figcaption></figure>

<h2 align="center">How to use Pentagram Box:</h2>

{% hint style="info" %}

<p align="center">Press the right mouse button and the items will be thrown to the ground. Just press the 'Space' key to pick up the items.</p>
{% endhint %}

<figure><img src="https://522801306-files.gitbook.io/~/files/v0/b/gitbook-x-prod.appspot.com/o/spaces%2FWkHrPTCMsd8do1wbyrNs%2Fuploads%2Flr42Cyn7HT2bc20aFRyt%2Fpentagrambox.gif?alt=media&amp;token=9b1267b7-e191-420b-a3f1-1516e6584ecb" alt="" width="375"><figcaption></figcaption></figure>

{% hint style="info" %}

<p align="center">Press the 'ALT' key and right-click on your pentagram to open the window. Now just add your errtels to the slots on the same figure to match them. and then press the right button to equip your pentagram</p>
{% endhint %}

<figure><img src="https://522801306-files.gitbook.io/~/files/v0/b/gitbook-x-prod.appspot.com/o/spaces%2FWkHrPTCMsd8do1wbyrNs%2Fuploads%2FsF4CCn6BGwuQCgAVdZ5J%2Fpentagram2.gif?alt=media&amp;token=d58083d2-4268-44c1-b70d-c3a7fb5dc8ce" alt="" width="313"><figcaption></figcaption></figure>

<h2 align="center">Configure MUHELPER:</h2>

{% hint style="info" %}

<p align="center">Your helper can be turned on from level 10, configure your skill, attack range and self-collection of items so that you can play more easily. Turn on/off by pressing the mouse scroll or open your window by pressing the [Z] key</p>
{% endhint %}

<div><figure><img src="https://522801306-files.gitbook.io/~/files/v0/b/gitbook-x-prod.appspot.com/o/spaces%2FWkHrPTCMsd8do1wbyrNs%2Fuploads%2FtI57Tz7nWeGxiAff4u9K%2Fhelper2.png?alt=media&amp;token=81c2b771-4089-4612-84bd-4ec221da185e" alt="" width="236"><figcaption></figcaption></figure> <figure><img src="https://522801306-files.gitbook.io/~/files/v0/b/gitbook-x-prod.appspot.com/o/spaces%2FWkHrPTCMsd8do1wbyrNs%2Fuploads%2FxY69vAfPTd34QHUeBjS2%2Fhelper1.png?alt=media&amp;token=178a0611-accd-44a5-b50e-6dfcfb31ee8a" alt="" width="225"><figcaption></figcaption></figure></div>

## Spot for beginners:

{% hint style="info" %}

<p align="center">The exit from the Lorencia/Noria/Elbeland maps are the first mob points that you can hunt to receive XP and ZEN and begin your journey on the server.</p>
{% endhint %}

## Buff for beginners:

{% hint style="info" %}

<p align="center">At each exit from the Lorencia/Noria/Elbeland maps you will find the npc 'Shadow Phantom Soldier' ​​where you can click to talk and receive a buff to facilitate your start of the journey.</p>
{% endhint %}

<figure><img src="https://522801306-files.gitbook.io/~/files/v0/b/gitbook-x-prod.appspot.com/o/spaces%2FWkHrPTCMsd8do1wbyrNs%2Fuploads%2FTvIdESVKC7ipKQnc3ZNp%2Fshadowphantom.png?alt=media&amp;token=dcd3ee07-8c45-497c-90ae-04a7b657dc24" alt=""><figcaption></figcaption></figure>

{% hint style="info" %}

<p align="center"><strong>Now you are ready to start your journey and explore the entire continent of LevelMU have fun.</strong></p>
{% endhint %}


# How to get Items

{% hint style="info" %}
Your first items on the server can be obtained through Box drops. You can get some Boxes by dropping from mobs and others from invasions.

**Silver Medal,  Gold Medal,  Box of Heaven**

* Can be obtained by killing mobs on any map in the game.

**Box of Kundum +1** \
**Box of Kundum +2**

* Can be purchased from NPC Lumen in Lorencia.
  {% endhint %}

<figure><img src="https://522801306-files.gitbook.io/~/files/v0/b/gitbook-x-prod.appspot.com/o/spaces%2FWkHrPTCMsd8do1wbyrNs%2Fuploads%2FOcLI3OtcKfN7xdoc1Lqq%2Fitemd.png?alt=media&amp;token=0b7cee40-cfb0-4ac9-840c-3528259494d6" alt=""><figcaption></figcaption></figure>

{% hint style="info" %}
And on the maps of Lorencia/Noria/Elbeland, which are the maps of origin for each character, there are NPCs that you can buy items for zen.
{% endhint %}

## Box of Kundum:

{% hint style="info" %}
Box +1 and +2 are sold at the npc. Box +3 +4 +5 are obtained through golden invasions.
{% endhint %}


# NPC Skill Shop

{% hint style="info" %}
The Skill Shop is located in Lorencia coordinates (137,139) where you can buy your skills.
{% endhint %}

<figure><img src="https://522801306-files.gitbook.io/~/files/v0/b/gitbook-x-prod.appspot.com/o/spaces%2FWkHrPTCMsd8do1wbyrNs%2Fuploads%2FOTqbs7vxxwZpOAl2nDbL%2Fnpcskill.png?alt=media&amp;token=b0ee34d1-d7f6-4e0e-bf0c-f0ab194c1ea8" alt=""><figcaption></figcaption></figure>

{% hint style="info" %}
After purchasing your skills, simply fulfill the requirements and press the right button to use your skill. Press the \[U] hotkey to open the skills window.
{% endhint %}


# Command List

## 🎮Hotkeys: <a href="#hotkeys" id="hotkeys"></a>

<kbd>**D:**</kbd> <kbd></kbd><kbd>‣</kbd> <kbd></kbd><kbd>**opens a list of character commands.**</kbd>

<kbd>**F:**</kbd> <kbd></kbd><kbd>‣</kbd> <kbd></kbd><kbd>**opens the Friends List and Mailbox.**</kbd>

<kbd>**B:**</kbd> <kbd></kbd><kbd>‣</kbd> <kbd></kbd><kbd>**opens the Gens information window.**</kbd>

<kbd>**G:**</kbd> <kbd></kbd><kbd>‣</kbd> <kbd></kbd><kbd>**opens your guilds information.**</kbd>

<kbd>**A:**</kbd> <kbd></kbd><kbd>‣</kbd> <kbd></kbd><kbd>**opens the Master Skill Tree window.**</kbd>

<kbd>**Ctrl + A:**</kbd> <kbd></kbd><kbd>‣</kbd> <kbd></kbd><kbd>**opens the Enhance Skill Tree window.**</kbd>

<kbd>**Ctrl + V:**</kbd> <kbd></kbd><kbd>‣</kbd> <kbd></kbd><kbd>**opens the event inventory window.**</kbd>

<kbd>**N:**</kbd> <kbd></kbd><kbd>‣</kbd> <kbd></kbd><kbd>**opens party & guild matching.**</kbd>

<kbd>**X:**</kbd> <kbd></kbd><kbd>‣</kbd> <kbd></kbd><kbd>**opens the Cash Item Shop.**</kbd>

<kbd>**P:**</kbd> <kbd></kbd><kbd>‣</kbd> <kbd></kbd><kbd>**opens the Personal Store List.**</kbd>

<kbd>**L:**</kbd> <kbd></kbd><kbd>‣</kbd> <kbd></kbd><kbd>**opens the window hunt system.**</kbd>\
\ <kbd>**I, or V:**</kbd> <kbd></kbd><kbd>‣</kbd> <kbd></kbd><kbd>**opens the character inventory.**</kbd>

<kbd>**I, then S:**</kbd> <kbd></kbd><kbd>‣</kbd> <kbd></kbd><kbd>**opens the Personal Store window.**</kbd>

<kbd>**K:**</kbd> <kbd></kbd><kbd>‣</kbd> <kbd></kbd><kbd>**opens tthe Gremory Case.**</kbd>

<kbd>**C:**</kbd> <kbd></kbd><kbd>‣</kbd> <kbd></kbd><kbd>**opens the character's stat menu.**</kbd>

<kbd>**U:**</kbd> <kbd></kbd><kbd>‣</kbd> <kbd></kbd><kbd>**opens the character's skill tree.**</kbd>

<kbd>**Z:**</kbd> <kbd></kbd><kbd>‣</kbd> <kbd></kbd><kbd>**opens the MU Helper settings.**</kbd>

<kbd>**M:**</kbd> <kbd></kbd><kbd>‣</kbd> <kbd></kbd><kbd>**opens the warp window.**</kbd>

<kbd>**T:**</kbd> <kbd></kbd><kbd>‣</kbd> <kbd></kbd><kbd>**opens the quest window.**</kbd>

<kbd>**Y:**</kbd> <kbd></kbd><kbd>‣</kbd> <kbd></kbd><kbd>**opens the Muun inventory.**</kbd>

<kbd>**END:**</kbd> <kbd></kbd><kbd>‣</kbd> <kbd></kbd><kbd>**opens the Hunting Log.**</kbd>

<kbd>**O:**</kbd> <kbd></kbd><kbd>‣</kbd> <kbd></kbd><kbd>**opens the Option Menu.**</kbd>

<kbd>**ESC:**</kbd> <kbd></kbd><kbd>‣</kbd> <kbd></kbd><kbd>**opens the System Menu.**</kbd>

<kbd>**F1:**</kbd> <kbd></kbd><kbd>‣</kbd> <kbd></kbd><kbd>**opens the in-game Play Guide.**</kbd>

<kbd>**F2:**</kbd> <kbd></kbd><kbd>‣</kbd> <kbd></kbd><kbd>**opens the Block Users window.**</kbd>\
\ <kbd>**Tab:**</kbd> <kbd></kbd><kbd>‣</kbd> <kbd></kbd><kbd>**opens the mini-map:**</kbd>

<kbd>**use ]**</kbd> <kbd></kbd><kbd>‣</kbd> <kbd></kbd><kbd>**to increases opacity**</kbd>

<kbd>**use \[**</kbd> <kbd></kbd><kbd>‣</kbd> <kbd></kbd><kbd>**to decreases opacity**</kbd>

<kbd>**use -**</kbd> <kbd></kbd><kbd>‣</kbd> <kbd></kbd><kbd>**to reduces size**</kbd>

<kbd>**use +**</kbd> <kbd></kbd><kbd>‣</kbd> <kbd></kbd><kbd>**to increases size**</kbd>

<kbd>**F10: ‣ Turn on/off 3d camera F11: ‣ Return default camera**</kbd>

## 💻Commands: <a href="#commands" id="commands"></a>

## &#x20;**Open Store:** <a href="#open-store" id="open-store"></a>

{% hint style="info" %}
**- Set the value in "ZEN"** **- Type the Command: /store coin ; /store gp ; /store ruud**

**IMPORTANT: To offstore just open store and command to offstore (Example: /offstore)** **IMPORTANT: Do not open your store with the OPEN button.Without command will sell things to Zen!**
{% endhint %}

## &#x20;**Offline LevelUP:** <a href="#offline-levelup" id="offline-levelup"></a>

{% hint style="info" %}
**/offattack -> Use the Offlevel System (configuration of MuHelper will be used here)** **(Some low maps the Offlevel does not work, only in mid/high maps)** **/offlevel -> Use the Offlevel System (configuration of MuHelper will be used here)** **(Some low maps the Offlevel does not work, only in mid/high maps)**
{% endhint %}

## &#x20;**Add Points:** <a href="#add-points" id="add-points"></a>

{% hint style="info" %}
**/addstr xxx -> Adds points to strength.**

**/addagi xxx -> Adds points to agility.**

**/addene xxx -> Adds points to energy**

**/addvit xxx -> Adds points to vitality**

**/addcmd xxx -> Adds points to command**
{% endhint %}

## &#x20;**Auto Distribute Points:** <a href="#auto-distribute-points" id="auto-distribute-points"></a>

{% hint style="info" %}
**/addstr auto X -> Auto Adds X points to strenght**

**/addagi auto X -> Auto Adds X points to agility**

**/addene auto X -> Auto Adds X points to energy**

**/addvit auto X -> Auto Adds X points to vitality**

**/addcmd auto X -> Auto Adds X points to command**

**\*To disable: /addstr auto**
{% endhint %}

## &#x20;**Clean PK:** <a href="#clean-pk" id="clean-pk"></a>

{% hint style="info" %}
**/pkclear ->** This command will charge an amount in Zen to clear your pk.
{% endhint %}

### &#x20;**Extras:** <a href="#extras" id="extras"></a>

{% hint style="info" %}
**/openware -> Open ware in spot** **/ware 1-5 -> Change your ware to another one (VIP)**&#x20;
{% endhint %}


# GameUtils Panel

<figure><img src="https://522801306-files.gitbook.io/~/files/v0/b/gitbook-x-prod.appspot.com/o/spaces%2FWkHrPTCMsd8do1wbyrNs%2Fuploads%2FnAZLp7G9LXyIzLnXG4t1%2Fimage.png?alt=media&amp;token=29f56269-8f5d-4e5c-a68c-6441bd27c8b0" alt=""><figcaption></figcaption></figure>

{% hint style="info" %}
Access the gameutils panel and enjoy various tools to manage your account and character.
{% endhint %}


# Potions Information

## How it Works:

{% hint style="info" %}
Potions at LevelMU: Stay prepared for battle with a variety of potions! From healing potions to fortifying elixirs, each bottle contains unique powers to help you face challenges. Keep your potions handy and use them strategically to ensure your survival.
{% endhint %}

## Healing Potion:

<figure><img src="https://522801306-files.gitbook.io/~/files/v0/b/gitbook-x-prod.appspot.com/o/spaces%2FWkHrPTCMsd8do1wbyrNs%2Fuploads%2FXnOWtPekuUKeZhkpKwSs%2Fhealing.png?alt=media&amp;token=44fab5d4-5792-465b-bc24-f17b5f21556c" alt=""><figcaption></figcaption></figure>

{% hint style="info" %}
Healing Potion, can be found at NPCs, such as: Lumen (bar), Potion Girl.

Effects: Consists of accelerating HP recovery.
{% endhint %}

## Mana Potion:

<figure><img src="https://522801306-files.gitbook.io/~/files/v0/b/gitbook-x-prod.appspot.com/o/spaces%2FWkHrPTCMsd8do1wbyrNs%2Fuploads%2F0wM3w1FegNrFT7bVXLuV%2Fmana.png?alt=media&amp;token=8f41b151-9acd-4e6d-a49d-9acb389c3bed" alt=""><figcaption></figcaption></figure>

{% hint style="info" %}
Mana Potion, can be found at NPCs, such as: Lumen (bar), Potion Girl.

Effects: Consists of accelerating MP recovery.
{% endhint %}

## Antidote:

<figure><img src="https://522801306-files.gitbook.io/~/files/v0/b/gitbook-x-prod.appspot.com/o/spaces%2FWkHrPTCMsd8do1wbyrNs%2Fuploads%2FPQd1gPRu1VgLI30wxbhQ%2Fantidote.png?alt=media&amp;token=9074b170-464f-437f-b2ca-d23c8d53042c" alt=""><figcaption></figcaption></figure>

{% hint style="info" %}
Antidotes can be dropped in spots, such as the spiders and skulls spots (Lorência) and purchased from the NPC Elf Lala (Noria).

Effects: Its objective is to accelerate healing, stop HP loss and return the character to normal speed. Generally coming from SM, MG and Elf skills, such as Scroll of Ice and Scroll of Poison and/or mobs that have this type of attack or debuff.
{% endhint %}

## Potion Blees:

<figure><img src="https://522801306-files.gitbook.io/~/files/v0/b/gitbook-x-prod.appspot.com/o/spaces%2FWkHrPTCMsd8do1wbyrNs%2Fuploads%2FbIJgu0otfltyPtkbBuGW%2Fpotionbless.png?alt=media&amp;token=b23cddb5-abff-4a14-972a-70db9654311c" alt=""><figcaption></figcaption></figure>

{% hint style="info" %}
Where to find it: The Potion of Bless is not droppable, nor can it be purchased. To acquire it, you must add Jewel of Bless to the Chaos Goblin in the option called 'Regular Combination' and then click to combine. Each Bless will yield 10 Potions of Bless. \
\
Effects: Your objective is to increase damage by 20% when attacking the castle gate and statue. Its effect lasts 1 minute. Note: It has no effect in PVP.
{% endhint %}

## Potion Soul:

<figure><img src="https://522801306-files.gitbook.io/~/files/v0/b/gitbook-x-prod.appspot.com/o/spaces%2FWkHrPTCMsd8do1wbyrNs%2Fuploads%2FQebVGBXXJ2YNbhBa5Bx9%2Fpotionsoul.png?alt=media&amp;token=def870be-7530-4ec0-80a8-604857dd9504" alt=""><figcaption></figcaption></figure>

{% hint style="info" %}
Where to find: The Potion of Soul is not droppable, nor can it be purchased. To acquire it, you must add Jewel of Soul to Chaos Goblin in the option called Regular Combination and then click to combine. Each Jewel of Soul will yield 10 Potions of Soul. \
\
Effects: Its objective is to increase stamina restoration (AG) by +8, increase defense against lightning and ice skills and increase attack speed by +20.
{% endhint %}

## Hotkey Potion:

<figure><img src="https://522801306-files.gitbook.io/~/files/v0/b/gitbook-x-prod.appspot.com/o/spaces%2FWkHrPTCMsd8do1wbyrNs%2Fuploads%2Fvoc5GBU5Am3mkrWnXp2s%2Fp1.png?alt=media&amp;token=85889ee0-3512-41ff-9cd7-ff053b5a342d" alt=""><figcaption></figcaption></figure>

{% hint style="info" %}
Potions can be saved to keyboard shortcuts. To do this, you must position the mouse over the item, hold CTRL+Q/W/E/R. The image shows the characteristics of each field within the game.
{% endhint %}


# BOSS Reward

## ⭐BOSS TIER 1:

### Medusa:

{% hint style="info" %}
Map → Swamp of Calmnes (GATE 2)\
Reward: 5000 Ruud + 2000 Goblin Points + 10 WCoin\
Drop: E.Rune + Miracle Coin + Ancient Item + Jewel + Bless of Light
{% endhint %}

### Lord Silvester:

{% hint style="info" %}
Map → Uruk Mountain 1\
Reward: 5000 Ruud + 2500 Goblin Points + 100 WCoin\
Drop: Kundun's Madness Blade + Kundun's Magic Spell Scrol + Empire Guardians' Stronghold + Ancient Icarus Scroll + Frag Radience Slot + Ancient Item + Bless of Light
{% endhint %}

### Core Magriffy:

{% hint style="info" %}
Map → Nars\
Reward: 5000 Ruud + 2500 Goblin Points + 100 WCoin\
Drop: Kundun's Madness Blade + Kundun's Magic Spell Scrol + Empire Guardians' Stronghold + Ancient Icarus Scroll + Frag Radience Slot + Ancient Item + Bless of Light + Steel of Heaven + Pet Muun&#x20;
{% endhint %}

### Lord Ferea:

{% hint style="info" %}
Map → Ferea\
Reward: 7500 Ruud + 4000 Goblin Points + 150 WCoin\
Drop: Garuda's Flame + Item Ancient + Kundun's Seal Scroll + Antonia's Sword + Arca's Prophecy
{% endhint %}

### Boss Nyx:

{% hint style="info" %}
Map → Nyx\
Reward: 10.000 Ruud + 5000 Goblin Points + 150 WCoin\
Drop: Garuda's Flame + Kundun's Seal Scroll + Antonia's Sword + Arca's Prophecy + BloodAngel Weapon + Archangel Weapon + Expansion radience Slot
{% endhint %}

### Illusion Kundum:

{% hint style="info" %}
Map → Kalima 6\
Reward: 500 Ruud + 500 Goblin Points + 5 WCoin\
Drop: Item 380
{% endhint %}

### Boss Kundum:

{% hint style="info" %}
Map → Kalima 7\
Reward: 5000 Ruud + 2000 Goblin Points + 10 WCoin\
Drop: E.Rune + Miracle Coin + Item Ancient + Jewel + Item 380 + Bless of Light
{% endhint %}

### Boss Gorgon:

{% hint style="info" %}
Map → Deep Dungeon 5\
Reward: 10.000 Ruud + 5000 Goblin Points + 25 WCoin\
Drop: Norrwen's Bloodstring Lyra + Lemuria's Orb + Runedil's Goldentune Harp + Divine Weapon + BloodAngel Weapon + Garuda's Flame + Pet Muun + Expansion Radience Slot
{% endhint %}

### God of Darkness:

{% hint style="info" %}
Map → Swamp of Darkness\
Reward: 12500 Ruud + 5000 Goblin Points + 150 WCoin\
Drop: Norrwen's Bloodstring Lyra + Lemuria's Orb + Runedil's Goldentune Harp + Divine Weapon + BloodAngel Weapon + Garuda's Flame + Pet Muun + Expansion Radience Slot
{% endhint %}

## ⭐BOSS TIER 2:

### Boss Lizard King:

{% hint style="info" %}
Map → Abyss Atlans 3\
Reward: 10.000 Ruud + 6000 Goblin Points + 300 WCoin\
Drop: Seal Ghost Horse + DarkAngel Weapon + Divine Weapon + Norrwen's Bloodstring Lyra + Lemuria's Orb + Runedil's Goldentune Harp + Pet Muun + Expansion Radience Slot + Garuda's Flame
{% endhint %}

### Boss Scorched:

{% hint style="info" %}
Map → Scorched Canyon\
Reward: 10.000 Ruud +6000 Goblin Points + 300 WCoin\
Drop: Seal Ghost Horse + DarkAngel Weapon + Divine Weapon + Norrwen's Bloodstring Lyra + Lemuria's Orb + Runedil's Goldentune Harp + Pet Muun + Expansion Radience Slot + Garuda's Flame
{% endhint %}

### Boss Phoenix:

{% hint style="info" %}
Map → Red Smoke Icarus\
Reward: 10.000 Ruud + 7500 Goblin Points + 300 WCoin\
Drop: Ice Dragon Seal + Seal Ghost Horse + DarkAngel Weapon + Divine Weapon + Norrwen's Bloodstring Lyra + Lemuria's Orb + Runedil's Goldentune Harp + Expansion Radience Slot + Garuda's Flame
{% endhint %}

### Boss Gargoyle:

{% hint style="info" %}
Map → Arenil Temple\
Reward: 10.000 Ruud + 7500 Goblin Points + 300 WCoin\
Drop: Ice Dragon Seal + Seal Ghost Horse + HolyAngel Weapon + Divine Weapon + Norrwen's Bloodstring Lyra + Lemuria's Orb + Runedil's Goldentune Harp + Expansion Radience Slot + Garuda's Flame + Pet Muun
{% endhint %}

### Boss Golem:

{% hint style="info" %}
Map → Ashen Aida\
Reward: 50.000 Ruud + 9000 Goblin Points + 300 WCoin\
Drop: Pierce Lyon Seal + Ice Dragon Seal + Seal Ghost Horse + HolyAngel Weapon + Divine Weapon + Norrwen's Bloodstring Lyra + Lemuria's Orb + Runedil's Goldentune Harp + Expansion Radience Slot + Garuda's Flame + Pet Muun + Brilliant Orb (I) + Antonias' Sword (I)
{% endhint %}

### Boss Crimson Harpy:

{% hint style="info" %}
Map → Blaze Kethotum\
Reward: 20.000 Ruud + 10000 Goblin Points + 400 WCoin\
Drop: Pierce Lyon Seal + Ice Dragon Seal + HolyAngel Weapon + Divine Weapon + Norrwen's Bloodstring Lyra + Lemuria's Orb + Runedil's Goldentune Harp + Expansion Radience Slot + Garuda's Flame + Pet Muun + Brilliant Orb (I) + Antonias' Sword (I)
{% endhint %}

### Boss Dreadfear:

{% hint style="info" %}
Map → Kanturu Under Area\
Reward: 25.000 Ruud + 10000 Goblin Points + 400 WCoin\
Drop: Shining Tail Seal + Pierce Lyon Seal + Ice Dragon Seal + AwakeSoul Weapon + Blessed Weapon + Norrwen's Bloodstring Lyra + Lemuria's Orb + Runedil's Goldentune Harp + Expansion Radience Slot + Garuda's Flame + Pet Muun + Brilliant Orb (I) + Antonias' Sword (I) + Clean Wing Core&#x20;
{% endhint %}

### Boss Shaman:

{% hint style="info" %}
Map → Ignis Vulcanos\
Reward: 30.000 Ruud + 10000 Goblin Points + 400 WCoin\
Drop: Shining Tail Seal + Pierce Lyon Seal + Ice Dragon Seal + AwakeSoulAngel Weapon + Blessed Weapon + Norrwen's Bloodstring Lyra + Lemuria's Orb + Runedil's Goldentune Harp + Expansion Radience Slot + Garuda's Flame + Pet Muun + Brilliant Orb (I) + Antonias' Sword (I) + Clean Wing Core&#x20;
{% endhint %}

### Boss Tantalos:

{% hint style="info" %}
Map → Blood Tarkan\
Reward: 40.000 Ruud + 20000 Goblin Points + 500 WCoin\
Drop: Giant Bear Seal + Shining Tail Seal + Pierce Lyon Seal + AwakeSoulAngel Weapon + Blessed Weapon + Norrwen's Bloodstring Lyra + Lemuria's Orb + Runedil's Goldentune Harp + Expansion Radience Slot + Garuda's Flame + Pet Muun + Brilliant Orb (I) + Antonias' Sword (I) + Clean Wing Core&#x20;
{% endhint %}

### Boss Storm:

{% hint style="info" %}
Map → Tormenta Island\
Reward: 50.000 Ruud + 30000 Goblin Points + 750 WCoin\
Drop: Leviathan Seal + Giant Bear Seal + Shining Tail Seal + Blue Eye Weapon + Blessed Weapon + Norrwen's Bloodstring Lyra + Lemuria's Orb + Runedil's Goldentune Harp + Expansion Radience Slot + Garuda's Flame + Pet Muun + Brilliant Orb (I) + Antonias' Sword (I) + Clean Wing Core
{% endhint %}

### Boss Twisted:

{% hint style="info" %}
Map → Twisted Karutan\
Reward: 60.000 Ruud + 40000 Goblin Points + 750 WCoin\
Drop: Leviathan Seal + Giant Bear Seal + Shining Tail Seal + Blue Eye Weapon + Blessed Weapon + Norrwen's Bloodstring Lyra + Lemuria's Orb + Runedil's Goldentune Harp + Expansion Radience Slot + Garuda's Flame + Pet Muun + Brilliant Orb (I) + Antonias' Sword (I) + Clean Wing Core
{% endhint %}

### Boss Temple:

{% hint style="info" %}
Map → Kardamahal Temple\
Reward:  60.000 Ruud + 50000 Goblin Points + 750 WCoin\
Drop: Leviathan Seal + Giant Bear Seal + Shining Tail Seal + Blue Eye Weapon + Blessed Weapon + Norrwen's Bloodstring Lyra + Lemuria's Orb + Runedil's Goldentune Harp + Expansion Radience Slot + Garuda's Flame + Pet Muun + Brilliant Orb (I) + Antonias' Sword (I) + Clean Wing Core
{% endhint %}

## Boss Doom:

{% hint style="info" %}
Map → Swamp of Doom\
Reward:  60.000 Ruud + 50000 Goblin Points + 750 WCoin\
Drop:  Blue Eye Weapon + Blessed Weapon + Norrwen's Bloodstring Lyra + Taurus Seal + Leviathan Seal + Giant Bear Seal + Shining Tail Seal + Lemuria's Orb + Runedil's Goldentune Harp + Expansion Radience Slot + Garuda's Flame + Pet Muun + Brilliant Orb (I) + Antonias' Sword (I) + Clean Wing Core
{% endhint %}

### Boss Aquila:

{% hint style="info" %}
Map → Aquilas Sanctuary\
Reward:  60.000 Ruud + 50000 Goblin Points + 750 WCoin\
Drop:  Blue Eye Weapon + Blessed Weapon + Norrwen's Bloodstring Lyra + Taurus Seal + Leviathan Seal + Giant Bear Seal + Shining Tail Seal + Lemuria's Orb + Runedil's Goldentune Harp + Expansion Radience Slot + Garuda's Flame + Pet Muun + Brilliant Orb (I) + Antonias' Sword (I) + Clean Wing Core
{% endhint %}

### Boss Forgotten

{% hint style="info" %}
Map → Forgotten Raklion\
Reward:  60.000 Ruud + 50000 Goblin Points + 750 WCoin\
Drop:  Blue Eye Weapon + Blessed Weapon + Norrwen's Bloodstring Lyra + Taurus Seal + Leviathan Seal + Giant Bear Seal + Shining Tail Seal + Lemuria's Orb + Runedil's Goldentune Harp + Expansion Radience Slot + Garuda's Flame + Pet Muun + Brilliant Orb (I) + Antonias' Sword (I) + Clean Wing Core
{% endhint %}

## ⭐Event Boss:

### Boss Selupan:

{% hint style="info" %}
Map → Raklion\
Reward: 2500 Ruud + 2500 Goblin Points + 50 WCoin\
Drop: Item Socket + Sphere Upgrade Rune Capsule + Socket Upgrade Note
{% endhint %}

### Boss Nightmare:

{% hint style="info" %}
Map → Relic Event Gate (Kanturu Relics 3)\
Reward: 5000 Ruud + 500 Goblin Points + 150 WCoin\
Drop: Item 380
{% endhint %}


# Invasion Reward

## ⭐Invasion Quest:

### Ice Queen:

{% hint style="info" %}
Map → Devias\
Reward: 200 GoblinPoints\
Drop: Miracle Coin + Jewel + Custom Jewel&#x20;
{% endhint %}

### Balrog:

{% hint style="info" %}
Map → Losttower\
Reward: 200 GoblinPoints\
Drop: Miracle Coin + Jewel + Custom Jewel&#x20;
{% endhint %}

### Gorgon:

{% hint style="info" %}
Map → Lorencia/Dungeon\
Reward: 250 GoblinPoints\
Drop: Miracle Coin + Jewel + Custom Jewel&#x20;
{% endhint %}

## ⭐Invasion Tier1:

### Metal Balrog:

{% hint style="info" %}
Map → Elbeland/Lorencia/Noria\
Reward: 500 Ruud + 300 GoblinPoints + 6 WCoin\
Drop: Miracle Coin + Item Wing craft 2.5
{% endhint %}

### Hydra:

{% hint style="info" %}
Map → Atlans\
Reward: 250 GoblinPoints\
Drop: Miracle Coin + Jewel + Custom Jewel&#x20;
{% endhint %}

### Red Dragon:

{% hint style="info" %}
Map → Lorencia/Noria\
Reward: 600 Ruud + 250 GoblinPoints\
Drop: Jewel + Bless of Light
{% endhint %}

### Skeleton King:

{% hint style="info" %}
Map → Lorencia/Noria\
Reward: 600 + 200 GoblinPoints + 2 WCoin\
Drop: Jewel + Bless of Light
{% endhint %}

### White Wizard:

{% hint style="info" %}
Map → Devias\
Reward: 1000 Ruud + 200 GoblinPoints + 10 WCoin\
Drop: Jewel + Bless of Light
{% endhint %}

### Super Golden Invasion:

{% hint style="info" %}
Map → Lorencia\
Reward: 500 GoblinPoints + 10 WCoin\
Drop: Box of Kundum
{% endhint %}

### Golden:

{% hint style="info" %}
Map → All  low maps\
Reward:  -\
Drop: Box of Kundum
{% endhint %}

## ⭐Invasion Tier2:

### Salamander:

{% hint style="info" %}
Map → Debender\
Reward: 300 Ruud + 1000 GoblinPoints\
Drop: Pentagram 180 + Miracle Coin + Jewel Custom
{% endhint %}

### Undine:

{% hint style="info" %}
Map → Ubaid Alkaamar\
Reward: 250 Ruud (Chance) + 100 GoblinPoints\
Drop: Miracle Coin + Ancient Item + E.Rune + Mithril
{% endhint %}

## Hellraiser:

{% hint style="info" %}
Map → Uruk Nars\
Reward: 400 Ruud + 1000 GoblinPoints\
Drop: Pentagram 180 + Miracle Coin + Jewel Custom
{% endhint %}

### Deep Dungeon:

{% hint style="info" %}
Map → Deep 1-2-3\
Reward: 600 Ruud + 1000 GoblinPoints\
Drop: Guardian Stone + Elite Stone + Sculpture + xAngel Item Exc + Jewel Custom
{% endhint %}

### Gnome:

{% hint style="info" %}
Map → Ferea\
Reward: 500 Ruud + 1000 GoblinPoints\
Drop: Guardian Stone + Elite Stone + Sculpture + xAngel Item Exc + Jewel Custom
{% endhint %}

### Kubera:

{% hint style="info" %}
Map → Kubera Mine\
Reward: 750 Ruud + 1000 GoblinPoints\
Drop: Guardian Stone + Elite Stone + Sculpture + xAngel Item Exc + Jewel Custom
{% endhint %}

### Nixies:

{% hint style="info" %}
Map → Nixies Lake\
Reward: 500 Ruud + 1000 GoblinPoints\
Drop: Guardian Stone + Elite Stone + Sculpture + xAngel Item Exc + Jewel Custom
{% endhint %}

### Swamp:

{% hint style="info" %}
Map → Swamp of Darkness\
Reward: 700 Ruud + 1000 GoblinPoints\
Drop: Guardian Stone + Elite Stone + Sculpture + xAngel Item Exc + Jewel Custom
{% endhint %}

## ⭐Invasion Tier3:

### Aida:

{% hint style="info" %}
Map → Ashen Aida\
Reward:  Ruud + GoblinPoints + WCoinC\
Drop: Legendary Stone + Uriel Feather + Ability Decision + Wing Core Reinforcement Stone + Item xAngel Exc + Jewel Custom
{% endhint %}

### Arenil:

{% hint style="info" %}
Map → Arenil Temple\
Reward:  Ruud + GoblinPoints + WCoinC\
Drop: Legendary Stone + Uriel Feather + Ability Decision + Wing Core Reinforcement Stone + Item xAngel Exc + Jewel Custom
{% endhint %}

### Abyss:

{% hint style="info" %}
Map → Abyss Atlans 1-2-3\
Reward:  Ruud + GoblinPoints + WCoinC\
Drop: Legendary Stone + Uriel Feather + Ability Decision + Wing Core Reinforcement Stone + Item xAngel Exc + Jewel Custom
{% endhint %}

### Tarkan:

{% hint style="info" %}
Map → Blood Tarkan\
Reward:  Ruud + GoblinPoints + WCoinC\
Drop: Legendary Stone + Uriel Feather + Ability Decision + Wing Core Reinforcement Stone + Item xAngel Exc + Jewel Custom
{% endhint %}

### Canyon:

{% hint style="info" %}
Map → Scorched Canyon\
Reward:  Ruud + GoblinPoints + WCoinC\
Drop: Legendary Stone + Uriel Feather + Ability Decision + Wing Core Reinforcement Stone + Item xAngel Exc + Jewel Custom
{% endhint %}

### Red Smoke:

{% hint style="info" %}
Map → Red Smoke Icarus\
Reward:  Ruud + GoblinPoints + WCoinC\
Drop: Legendary Stone + Uriel Feather + Ability Decision + Wing Core Reinforcement Stone + Item xAngel Exc + Jewel Custom
{% endhint %}

### Ignis:

{% hint style="info" %}
Map → Ignis Volcano\
Reward:  Ruud + GoblinPoints + WCoinC\
Drop: Legendary Stone + Uriel Feather + Ability Decision + Wing Core Reinforcement Stone + Item xAngel Exc + Jewel Custom
{% endhint %}

### Kanturu:

{% hint style="info" %}
Map → Kanturu Under Area\
Reward:  Ruud + GoblinPoints + WCoinC\
Drop: Legendary Stone + Uriel Feather + Ability Decision + Wing Core Reinforcement Stone + Item xAngel Exc + Jewel Custom
{% endhint %}

### Blaze:

{% hint style="info" %}
Map → Blaze Kethotum\
Reward:  Ruud + GoblinPoints + WCoinC\
Drop: Legendary Stone + Uriel Feather + Ability Decision + Wing Core Reinforcement Stone + Item xAngel Exc + Jewel Custom
{% endhint %}

### Tormenta:

{% hint style="info" %}
Map → Tormenta Island\
Reward:  Ruud + GoblinPoints + WCoinC\
Drop: Legendary Stone + Uriel Feather + Ability Decision + Wing Core Reinforcement Stone + Item xAngel Exc + Jewel Custom
{% endhint %}

### Twisted:

{% hint style="info" %}
Map → Twisted Karutan\
Reward:  Ruud + GoblinPoints + WCoinC\
Drop: Legendary Stone + Uriel Feather + Ability Decision + Wing Core Reinforcement Stone + Item xAngel Exc + Jewel Custom
{% endhint %}

### Kardamahal:

{% hint style="info" %}
Map → Kardamahal Temple\
Reward:  Ruud + GoblinPoints + WCoinC\
Drop: Legendary Stone + Uriel Feather + Ability Decision + Wing Core Reinforcement Stone + Item xAngel Exc + Jewel Custom
{% endhint %}

## Swamp of Doom:

{% hint style="info" %}
Map → Swamp of Doom\
Reward:  Ruud + GoblinPoints + WCoinC\
Drop: Legendary Stone + Uriel Feather + Ability Decision + Wing Core Reinforcement Stone + Item xAngel Exc + Jewel Custom
{% endhint %}

### Aquilas Sanctuary

{% hint style="info" %}
Map → Aquilas Sanctuary\
Reward:  Ruud + GoblinPoints + WCoinC\
Drop: Legendary Stone + Uriel Feather + Ability Decision + Wing Core Reinforcement Stone + Item xAngel Exc + Jewel Custom
{% endhint %}

### Forgotten Raklion

{% hint style="info" %}
Map → Forgotten Raklion\
Reward:  Ruud + GoblinPoints + WCoinC\
Drop: Legendary Stone + Uriel Feather + Ability Decision + Wing Core Reinforcement Stone + Item xAngel Exc + Jewel Custom
{% endhint %}


# Drops in Maps

{% hint style="info" %}
**Jewel of Guardian:** Kalima6, Kalima7, Land of Trials Gemstone: Kanturu, Old Kethotum, Under Kanturu

**Loch Feather:** Icarus, Kanturu Condor Flame: Barracks, Old Kethotum, Under Kanturu Fenrir: Crywolf

**Loch Magic Bell \[Lv2]:** Dungeon, Losttower, Atlans, Tarkan, Icarus Condor Magic Bell \[Lv3]: Aida, Kanturu, Swamp, Karutan

**Sphere:** Raklion, Nix, Tormenta Island Sphere Upgrade Rune: Raklion, Nix, Tormenta Island,Swamp of Doom

**Elemental Rune:** Archeron (Alkaamar, Ubaid, Debenter, UrukMountain, Nars) Mithril: Archeron (Alkaamar, Ubaid, Debenter, UrukMountain, Nars) Pentagram: Archeron (Alkaamar, Ubaid, Debenter, UrukMountain, Nars), Ferea, Nix, Deep Dungeon

**Guardian Stone:** Abyssal, Scorched, RedSmoke, Arenil, Ashen, Blaze, Under, Ignis, Blood, Tormenta, Twisted ,Swamp of Doom\
Elite Guardian Stone: Abyssal, Scorched, RedSmoke, Arenil, Ashen, Blaze, Under, Ignis, Blood, Tormenta, Twisted Conversion Fragment: Abyssal, Scorched, RedSmoke, Arenil, Ashen, Blaze, Under, Ignis, Blood, Tormenta, Twisted,Swamp of Doom

**Bless of Light:** BloodCastle, DevilSquare \
**Seed Capsule:** Abyssal, Scorched, RedSmoke, Arenil, Ashen, Blaze, Under, Ignis, Blood, Tormenta, Twisted,Swamp of Doom

**Mysterious Stone:**  Deep Dungeon, Dark Swamp, Kubera Mine Golden Crest: Deep Dungeon, Dark Swamp, Kubera Mine
{% endhint %}


# Box Drops

<table><thead><tr><th>Silver Box</th><th>Golden Box</th><th data-type="rating" data-max="5">Rating Receive Item</th></tr></thead><tbody><tr><td><em>Weapon BloodAngel</em></td><td><em>Weapon HolyAngel</em></td><td>5</td></tr></tbody></table>

<table><thead><tr><th>Gold Medal</th><th>Silver Medal</th><th data-type="rating" data-max="5">Rating Receive Item</th></tr></thead><tbody><tr><td><em>Glimmer,Mage Pad,Bone,Silk,Scale,Light Plate,Scale Gunner,Brass,Red Wing,Slayer Red Wing, Slayer (A),Plate,Sphinx,Wind,Rune Sphinx,Glimmer,Mage Pad,Robust,Gru Hill,Illusion Knight Iron Plate</em></td><td><em>Glimmer,Mage Pad,Legendary,Dragon,Black Dragon,Guardian,Adamantine,RedWing,Ancient,Glimmer,Mage Pad,Robust,Gru Hill,Rune Legendary,Spirit,Sacred Fire,Storm Crow,Light Plate,Demonic Slayer,Round Gunner,Illusion Knight Iron Plate</em></td><td>5</td></tr><tr><td><em>Blade, Elven Axe, Giant Trident, Double Poleaxe, Light CrossBow, CrossBow, Serpent Staff, Large Round Shield, Great Hammer, Serpent Sword, Book of Neil, Red Wing Stick, Mystery Stick, Flat Short Sword, Gorgon Staff, Entropy Gun, Plate Shield, Helical Sword, Double Blade, Tiger Bow, Bluewing Crossbow, Thunder Staff, Battle Scepter, Lapid Lance, Lapid Shield</em></td><td><em>Plate Shield, Spiked Shield, Dragon Slayer Shield, Alacran Lance, Alacran Shield, Conmocion Lance, Elemental Shield, El Hazard Shield, Bill of Balrog, Crystal Sword, Staff of Resurrection, Saint Crossbow, Master Scepter, Ancient Stick, Book of Lagle, Dacia Short Sword, Lighting Sword, Giant Sword, Silver Bow, Legendary Staff, Legendary Shield, Sacred Glove, Elemental Rune Mace, Aquagold Crossbow, Entropy Gun, Magic Frere Gun</em></td><td>5</td></tr></tbody></table>

<table><thead><tr><th>Box of Heaven</th><th data-type="rating" data-max="5">Rating Receive Item</th></tr></thead><tbody><tr><td>Guardian, Angel, Imp, Demon, Horn of Uniria, Ring of Ice, Ring of Poison, Pendant of Lighting, Pendant of Fire, Jewel of Bless, Jewel of Soul, Jewel of Chaos, Pet Hudolff</td><td>5</td></tr></tbody></table>

<table><thead><tr><th width="159" align="center">Box of Kundum +1</th><th width="146" align="center">Box of Kundum +2</th><th width="150" align="center" valign="middle">Box of Kundum +3</th><th width="147" align="center">Box of Kundum +4</th><th align="center">Box of Kundum +5</th></tr></thead><tbody><tr><td align="center"><p></p><p><img src="https://522801306-files.gitbook.io/~/files/v0/b/gitbook-x-prod.appspot.com/o/spaces%2FWkHrPTCMsd8do1wbyrNs%2Fuploads%2FGv3McEvdkWuQBlwX3hPl%2Fkundum1.png?alt=media&amp;token=95a4169c-5a86-43f0-b888-d66d8a2e1b16" alt="" data-size="line"></p></td><td align="center"><p></p><p><img src="https://522801306-files.gitbook.io/~/files/v0/b/gitbook-x-prod.appspot.com/o/spaces%2FWkHrPTCMsd8do1wbyrNs%2Fuploads%2F0nKkVPbDP8pLfrPNvygV%2Fkundum2.png?alt=media&amp;token=6c0e8829-cca3-43ee-bf09-8a9f47f01690" alt="" data-size="line"></p></td><td align="center" valign="middle"><p></p><p><img src="https://522801306-files.gitbook.io/~/files/v0/b/gitbook-x-prod.appspot.com/o/spaces%2FWkHrPTCMsd8do1wbyrNs%2Fuploads%2FOkLYvEncXSIlryMrojKa%2Fkundum3.png?alt=media&amp;token=af704e7f-80e3-4f19-bc0b-c8d708e1087a" alt="" data-size="line"></p></td><td align="center"><p></p><p><img src="https://522801306-files.gitbook.io/~/files/v0/b/gitbook-x-prod.appspot.com/o/spaces%2FWkHrPTCMsd8do1wbyrNs%2Fuploads%2FUb18vNYGLcQwovVHYoBH%2Fkundum4.png?alt=media&amp;token=6f721368-0c8e-4255-a243-94120d837adc" alt="" data-size="line"></p></td><td align="center"><p></p><p><img src="https://522801306-files.gitbook.io/~/files/v0/b/gitbook-x-prod.appspot.com/o/spaces%2FWkHrPTCMsd8do1wbyrNs%2Fuploads%2FV0jyX5HgvKAMveapjM0W%2Fkundum5.png?alt=media&amp;token=f2a7b323-dd2c-4f9a-9fd9-71f405bba319" alt="" data-size="line"></p></td></tr><tr><td align="center"><strong>Set</strong></td><td align="center"><strong>Set</strong></td><td align="center" valign="middle"><strong>Set</strong></td><td align="center"><strong>Set</strong></td><td align="center"><strong>Set</strong></td></tr><tr><td align="center"><em>Leather,Bronze,Pad,Bone,Vine,Silk,Scale,Rune Pad,Mage Pad,Slayer Red Wing,Illusion Knight Scale</em></td><td align="center"><em>Brass,Sphinx,Leather Gunner,Wind,Spirit,Violent Wind,Plate,Rune Sphinx,Mage Sphinx,Glimmer,Slayer (A), Illusion Knight Iron Plate</em></td><td align="center" valign="middle"><em>Red Wing,Legendary,Dragon,Ashcrow,Guardian,Robust,Gru Hill,Sacred,Adamantine,Light Plate,Storm Crow,Rune Legendary,Slayer Demonic,Mage Legendary,Light Ray,Illusion Iron Plate</em></td><td align="center"><em>Dark Phoenix,Eclipse,Iris,Valiant,</em><br><em>DarkSteel,Ancient,Flash,</em><br><em>Storm Jahad,Thunder Hawk,Holy Spirit,Grand Soul,Black Dragon,Glorious,Princie, Steel Plate</em></td><td align="center"><em>Piercing Groove,Hurricane,Red Spirit,Dark Soul,Great Dragon,Dark Master,Demonic,Sate,Hirat,Night Wing,Frere,Kenaz,Magic Flare,Noble Pixie,Black Origin</em></td></tr><tr><td align="center"><strong>Weapon</strong></td><td align="center"><strong>Weapon</strong></td><td align="center" valign="middle"><strong>Weapon</strong></td><td align="center"><strong>Weapon</strong></td><td align="center"><strong>Weapon</strong></td></tr><tr><td align="center"><em>Mace, CrossBow, Bow, Short Bow, Skull Staff, Hand Axe, Small Axe, Rapier, Short Sword, Kriss, Flat Short Sword</em></td><td align="center"><em>Flail, Morning Star, Prickle Lance, Entropy Gun, Lapid Lance, Giant Trident, Spear, Halberd, Double Poleaxe, Dragon Lance, Arquebus, Battle Bow, Golden Crossbow, Elven Bow, Mystery Stick, Angelic Staff, Elven Axe, Falchion, Gladius, Tomahawk, Double Axe, Sword of Assassin, Katana,  Royal Orb, Basic Magic Book</em></td><td align="center" valign="middle"><em>Great Hammer, Berdysh, Serpent Spear, Lighting Sword, Serpent Crossbow, Light Crossbow, Tiger Bow, Violent Wind Stick, Thunder Staff, Serpent Staff, Larkan Axe, Bill of Balrog, Battle Axe, Double Blade, Legendary Sword, Light Saber, Sword of Salamander, Serpent Sword, Blade,  Combat Quiver, Book of Sahamut, Myotis Orb, Elemental Magic Book</em></td><td align="center"><em>Sword of Destruction, Dragon Soul Staff, Crystal Morning Star, Lord Scepter, Great Scepter, Alacran Lance, Conmocion Lance, Bill of Balrog, Dark Breaker, Great Scythe, Combat Quiver, Bluewing Crossbow, Chaos Nature Bow, Silver Bow, Book of Neil, Red Wing Stick, Legendary Staff, Staff of Resurrection, Crescent Axe, Sacred Glove, Giant Sword, Lighting Sword, Crystal Sword, Chaos Lighting Staff,  Rune Blade, Thunder Blade, Celestial Bow, Ancient Stick, Blue Moon Orb, Elemental Magic Book, Silver Blade</em></td><td align="center"><em>Knight Blade, Xeno Blade, Raven Stick, Chrome Staff, Aileen Bow, Striker Scepter, Platina Staff, Cookery Short Sword, Brova, Albatross bow, Arrow Viper bow, Frere gun, Book of Lagle, Vis Lance, Sword Dancer, Dark Reign Blade, Pluma Lance, Great Lord Scepter, Demonic Stick, El hazard mace, Elemental Mace, Piercing grove Claws, Dark Breaker, Blue Moon Orb, Shining Feather Magic Book</em></td></tr><tr><td align="center"><strong>Shield</strong></td><td align="center"><strong>Shield</strong></td><td align="center" valign="middle"><strong>Shield</strong></td><td align="center"><strong>Shield</strong></td><td align="center"><strong>Shield</strong></td></tr><tr><td align="center"><em>Buckler, Horn Shield, Small Shield</em></td><td align="center"><em>Lapid Shield, Large Round Shield, Skull Shield, Kite Shield</em></td><td align="center" valign="middle"><em>Plate Shield, Spiked Shield, Dragon Slayer Shield, Elven Shield</em></td><td align="center"><em>Alacran Shield, Legendary Shield, Bronze Shield, Serpent Shield</em></td><td align="center"><em>Pluma Shield, Cross Shield, Elemental Shield, Grand Soul Shield</em></td></tr></tbody></table>

{% hint style="info" %}
**Alchemist items have been added to all drops.**
{% endhint %}


# BloodAngel Soul

For you to create your bloodangel soul it is very easy, just go to the chaos machine located in noria to make your crafts

## Requirements:

{% hint style="info" %}
Now you need the minimum level +11 +16 ancient items\
**- Open the NPC and go to Mastery Crafting > BloodAngel's Spirit Craft.**
{% endhint %}

<figure><img src="https://522801306-files.gitbook.io/~/files/v0/b/gitbook-x-prod.appspot.com/o/spaces%2FWkHrPTCMsd8do1wbyrNs%2Fuploads%2F9XuMnRoLciAJwgZHXCxQ%2Fglobin1.png?alt=media&amp;token=d13cf3e4-da86-4386-b89e-53d22f1900ab" alt=""><figcaption></figcaption></figure>


# Unlock BloodAngel

Removing the seal from your bloodangel is very easy, just go to the chaos machine located in noria to make your crafts.

## Requirements:

{% hint style="info" %}
Sealed BloodAngel item + BloodAngel Soul\
**- Open the NPC and go to Mastery Crafting > Mastery Crafting Upgrade.**
{% endhint %}

<figure><img src="https://522801306-files.gitbook.io/~/files/v0/b/gitbook-x-prod.appspot.com/o/spaces%2FWkHrPTCMsd8do1wbyrNs%2Fuploads%2FqiY4mZk2aqCQjaBaKuYJ%2Fglobin2.png?alt=media&amp;token=5ab1083c-bfd8-44cd-9991-9fbe478b0301" alt=""><figcaption></figcaption></figure>


# Upgrade Mastery Item

To evolve your xAngel items, simply go to the chaos machine located in Noria to make your crafts.

{% hint style="info" %}
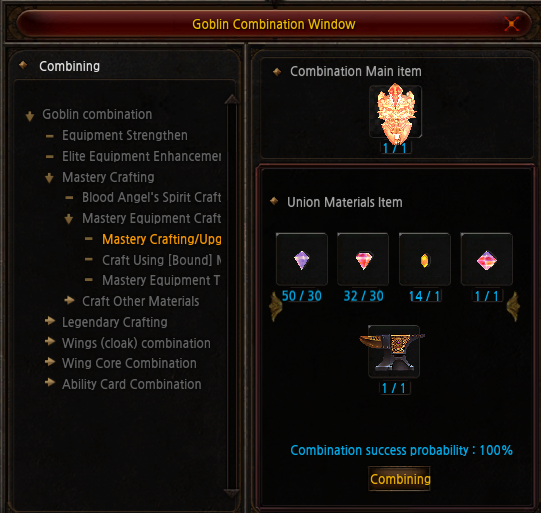
**- Open the NPC and go to Mastery Crafting > Mastery Equipment Craft >  Mastery Crafting Upgrade.**
{% endhint %}

<figure><img src="https://522801306-files.gitbook.io/~/files/v0/b/gitbook-x-prod.appspot.com/o/spaces%2FWkHrPTCMsd8do1wbyrNs%2Fuploads%2F0xEILgdUpQXQ2ZYYhrcN%2Fglobin3.png?alt=media&amp;token=3480e5dd-4c3f-48d3-aab1-9ce2cf637716" alt=""><figcaption></figcaption></figure>

{% hint style="info" %}
The chance of combination is 100%\
\- Options Excellent are permanent.\
\- Options harmony are lost.\
\- Mysterious bônus are permanent.
{% endhint %}


# Upgrade Level Item

To improve the level of your equipment, pentagram, wings, etc. just go to the chaos machine located in Noria to make your crafts.

{% hint style="info" %}
**- Open the NPC and go to Goblin Combination > Equipament Strengthen.**
{% endhint %}

<figure><img src="https://522801306-files.gitbook.io/~/files/v0/b/gitbook-x-prod.appspot.com/o/spaces%2FWkHrPTCMsd8do1wbyrNs%2Fuploads%2FYPUmfZ9FgyBUsTxnbq2z%2Fglobin4.png?alt=media&amp;token=1328f3ae-5472-4ad1-a672-f4800c300e38" alt=""><figcaption></figcaption></figure>

{% hint style="info" %}
In case of failure, your equipment will not disappear.
{% endhint %}


# Craft Rate

## &#x20;Equipment Strengthen: <a href="#equipment-strengthen" id="equipment-strengthen"></a>

{% hint style="info" %}
+11 to +15: 60%

VIP: +10% Luck: +10%
{% endhint %}

## Wings Combination: <a href="#wings-combination" id="wings-combination"></a>

{% hint style="info" %}
Creation of all wings 40\~60%
{% endhint %}

## Earrings Upgrade: <a href="#earrings-upgrade" id="earrings-upgrade"></a>

{% hint style="info" %}
Upgrade +11 to +12: 60%\
Upgrade +13 to +14: 70%\
Upgrade +15: 100%\ <mark style="color:red;">With each earring upgrade, the options will be random 1\~5</mark>
{% endhint %}

## Upgrade Level: <a href="#upgrade-level" id="upgrade-level"></a>

* Rank 1 → Level: 0-7Level = 65%
* Rank 2 → Level: 0-7Level = 65%
* Rank 3 → Level: 0-7Level = 65%
* Rank 4 → Level: 0-7Level = 65%&#x20;
* Rank 5 → Level: 0-7Level = 65%&#x20;
* Rank 1 → Level: 7-10Level = 55%&#x20;
* Rank 2 → Level: 7-10Level = 55%&#x20;
* Rank 3 → Level: 7-10Level = 55%&#x20;
* Rank 4 → Level: 7-10Level = 55%&#x20;
* Rank 5 → Level: 7-10Level = 55%

<mark style="color:red;">(We recommend use the item \[Elemental Talisman of Chaos A.] to avoid the item break from failure)</mark>

## Upgrade Mastery and rank Errtel: <a href="#upgrade-mastery" id="upgrade-mastery"></a>

{% hint style="info" %}
During crafting to master your errtel there is a chance of failure.<br>

* Level 7 = 80%
* Level 8 = 85%
* Level 9 = 90%
* Level 10 = 100%
  {% endhint %}

## **Errtel Evolution:** <a href="#errtel-evolution" id="errtel-evolution"></a>

{% hint style="info" %}
**Runedil's Goldentune Harp & Lemuria's Orb = Upgrade Antonia** **Norrwen's** \
**Bloodstring Lyra = Upgrade Brilliant Orb**
{% endhint %}


# Magic Stone Combination

To create your Magic Stone, simply go to the chaos machine located in Noria to make your crafts.

{% hint style="info" %}
Click on Magic Stone Combination.
{% endhint %}

<figure><img src="https://522801306-files.gitbook.io/~/files/v0/b/gitbook-x-prod.appspot.com/o/spaces%2FWkHrPTCMsd8do1wbyrNs%2Fuploads%2FB66LCcK04EA3J5fdYtmW%2Fstone1.gif?alt=media&amp;token=dd6ee6af-1c77-4616-847a-e046bfc14aa3" alt="" width="225"><figcaption></figcaption></figure>

### **Lower Spirit Stone:**

<figure><img src="https://522801306-files.gitbook.io/~/files/v0/b/gitbook-x-prod.appspot.com/o/spaces%2FWkHrPTCMsd8do1wbyrNs%2Fuploads%2F9KPT9SdTw3kqQKkUlLlt%2Fl1.png?alt=media&amp;token=ec418d34-6ffe-4bd7-b67d-3487efd4e489" alt=""><figcaption></figcaption></figure>

{% hint style="info" %}
***To create a Low Spirit Stone, the player will use a normal item with a minimum quality of +11 +4 additional life, go to the chaos machine and select the second option.***
{% endhint %}

### **Medium Spirit Stone:**

<figure><img src="https://522801306-files.gitbook.io/~/files/v0/b/gitbook-x-prod.appspot.com/o/spaces%2FWkHrPTCMsd8do1wbyrNs%2Fuploads%2FAFQw1RqXaN4Shr3gSDOt%2Fl2.png?alt=media&amp;token=14bf7b9c-49ec-4638-b544-2c77614e64ec" alt=""><figcaption></figcaption></figure>

{% hint style="info" %}
***To create the Medium Spirit Stone, the player will use an excellent item with a minimum quality of +11 +4 additional life.***
{% endhint %}

## Higher Spirit Stone:

<figure><img src="https://522801306-files.gitbook.io/~/files/v0/b/gitbook-x-prod.appspot.com/o/spaces%2FWkHrPTCMsd8do1wbyrNs%2Fuploads%2FKUWnLZWrSvLpeCIMqsqu%2Fl3.png?alt=media&amp;token=b34a3c1d-8230-4544-8929-619913665b49" alt=""><figcaption></figcaption></figure>

{% hint style="info" %}
***To create the Higher Spirit Stone, the player will use an ancient item with a minimum quality of +11 +4 additional life.***
{% endhint %}

### Top Spirit Stone:

<figure><img src="https://522801306-files.gitbook.io/~/files/v0/b/gitbook-x-prod.appspot.com/o/spaces%2FWkHrPTCMsd8do1wbyrNs%2Fuploads%2FilAsYT6H2Rdl8vnj71fY%2Fl4.png?alt=media&amp;token=a8ee5d74-6d0c-4b6d-adbd-940e88476cab" alt=""><figcaption></figcaption></figure>

{% hint style="info" %}
***To create the Top Spirit Stone, the player will use an BloodAngel item with a minimum quality of +11 +4 additional life.***
{% endhint %}


# Legendary Equipament Information

{% hint style="info" %}
Legendary Temple items are an upgrade and bonus system that is different from the classic system.
{% endhint %}

### Jewel Custom:

{% hint style="info" %}
**Jewel Custom:** Luck, Option do not work on legendary equipment. \
**Jewel Soul, Bless, Life:** do not work on temple equipment.\ <mark style="color:red;">Only Mysterious stone + Temple Guard Stone Work.</mark>\
(<mark style="color:blue;">We recommend that you add all excellent options to your equipment before transforming it into a temple.)</mark>
{% endhint %}

### Legendary Equipment Enhancement: <a href="#legendary-equipment-enhancement" id="legendary-equipment-enhancement"></a>

{% hint style="info" %}

<p align="center"><strong>Enhancement Levels:</strong></p>

<p align="center">Basic stats increase with each enhancement level</p>

<p align="center">Performed by Chaos Goblin NPC in Noria</p>

<p align="center"><strong>Enhancement Options:</strong></p>

<p align="center">Enhancement tiers from 1 to 5</p>

<p align="center">Option effects vary by equipment type</p>

<p align="center">Uses Temple Guard Upgrade Stones</p>

<p align="center">You need to reach stage 5 to evolve your item by 1 level. Example: +0 (Stage 5) -> +1 (Stage 1) -> +1 (Stage 5) -> +2 (Stage 1)</p>
{% endhint %}

Enhancement levels range from 0 to 15

Basic stats increase with each enhancement level

Performed by Chaos Goblin NPC in Noria

**Enhancement Options:**

Enhancement tiers from 1 to 5

Option effects vary by equipment type

Uses Temple Guard Upgrade Stones

You need to reach stage 5 to evolve your item by 1 level. Example: +0 (Stage 5) -> +1 (Stage 1) -> +1 (Stage 5) -> +2 (Stage 1)

## Weapon Ancient:

{% hint style="info" %}
Unlike xAngel weapons, now the Legendary temple weapon is Ancient.
{% endhint %}

<figure><img src="https://522801306-files.gitbook.io/~/files/v0/b/gitbook-x-prod.appspot.com/o/spaces%2FWkHrPTCMsd8do1wbyrNs%2Fuploads%2FkY5rPvuoVlw5QHoEd1Qu%2Ftemple1.png?alt=media&amp;token=539c5a53-7728-4149-a36c-3973242cd654" alt=""><figcaption></figcaption></figure>

## Temple Guard Anvil Information:

{% hint style="info" %}
Some classes have 2 types of Anvil specific only to that class. follow the information below.
{% endhint %}

<figure><img src="https://522801306-files.gitbook.io/~/files/v0/b/gitbook-x-prod.appspot.com/o/spaces%2FWkHrPTCMsd8do1wbyrNs%2Fuploads%2FRYCbMVGNgL2NaU5AfCAC%2Ftemple2.png?alt=media&amp;token=91bc7f78-f527-4fd2-9f62-0e265b671f4f" alt=""><figcaption></figcaption></figure>

{% hint style="info" %} <mark style="color:yellow;">**Temple Guard Anvil (White Wizard)**</mark>**&#x20;Staff Kundum**\ <mark style="color:yellow;">**Temple Guard Anvil (Wizard)**</mark>**&#x20;Staff Dark Wizard** \ <mark style="color:yellow;">**Temple Guard Anvil (Magic)**</mark>**&#x20;Staff Magic Gladiator**\ <mark style="color:orange;">**Temple Guard Anvil (Rage)**</mark>**&#x20;Sword BK Strength**  \ <mark style="color:orange;">**Temple Guard Anvil (Faith)**</mark>**&#x20;Sword BK Energy** \
\
&#x20;<mark style="color:red;">**Only these classes mentioned above have exclusive Anvil for that character. Other classes use the common Anvil as well as the old form with apocalypse etc.**</mark>
{% endhint %}


# Legendary Imperial Information

{% hint style="info" %}
It is necessary to have Legendary Temple +15 Stage 5 equipment to become Legendary Imperial.
{% endhint %}

### Jewel Custom:

{% hint style="info" %}
**Jewel Custom:** Luck, Option do not work on legendary equipment. \
**Jewel Soul, Bless, Life:** do not work on temple equipment.\ <mark style="color:red;">Only Mysterious stone + Temple Guard Stone Work.</mark>\
(<mark style="color:blue;">We recommend that you add all excellent options to your equipment before transforming it into a temple.)</mark>
{% endhint %}

### Legendary Equipment Enhancement: <a href="#legendary-equipment-enhancement" id="legendary-equipment-enhancement"></a>

{% hint style="info" %}

<p align="center"><strong>Enhancement Levels:</strong></p>

<p align="center">Basic stats increase with each enhancement level</p>

<p align="center">Performed by Chaos Goblin NPC in Noria</p>

<p align="center"><strong>Enhancement Options:</strong></p>

<p align="center">Enhancement tiers from 1 to 5</p>

<p align="center">Option effects vary by equipment type</p>

<p align="center">Uses Imperial  Upgrade Stones</p>

<p align="center">You need to reach stage 5 to evolve your item by 1 level. Example: +0 (Stage 5) -> +1 (Stage 1) -> +1 (Stage 5) -> +2 (Stage 1)</p>
{% endhint %}

### Extra Option:

<figure><img src="https://522801306-files.gitbook.io/~/files/v0/b/gitbook-x-prod.appspot.com/o/spaces%2FWkHrPTCMsd8do1wbyrNs%2Fuploads%2F5yLm5wWGvfysmdlHWZBr%2Fimage.png?alt=media&amp;token=db9b2f8b-bca7-43dd-b023-4bf87309d352" alt=""><figcaption></figcaption></figure>

{% hint style="info" %}

<p align="center">As your imperial equipment evolves, the extra option becomes stronger and stronger.</p>
{% endhint %}


# Craft Legendary

Creating your legendary temple items is very easy, just go to the chaos machine located in noria to make your crafts.

{% hint style="info" %}
Legendary Crafting > Legendary Crafting Upgrade\
Just add your weapon/set temple.
{% endhint %}

<figure><img src="https://522801306-files.gitbook.io/~/files/v0/b/gitbook-x-prod.appspot.com/o/spaces%2FWkHrPTCMsd8do1wbyrNs%2Fuploads%2F5lIvLNismnlqBIg7L4Q2%2Flegendary3.png?alt=media&amp;token=9cccfd09-8c57-466a-a901-cacf01193fd1" alt="" width="403"><figcaption></figcaption></figure>


# 5th Class Quest

## NPC Location:

<figure><img src="https://522801306-files.gitbook.io/~/files/v0/b/gitbook-x-prod.appspot.com/o/spaces%2FWkHrPTCMsd8do1wbyrNs%2Fuploads%2FmKrtmOQUJ8wkDxbo8rtM%2Feunice.gif?alt=media&amp;token=24d54c33-a985-419d-be2b-99feeaf2f70e" alt=""><figcaption></figcaption></figure>

{% hint style="info" %}
NPC Eunice is located in Devias (195,12) talk to Eunice to be directed to the quest map.
{% endhint %}

## Quest Requirements:

{% hint style="info" %}

* You need at least Level 1200
* You need to have done the 4th Class Quest (/evo)
* Go to the NPC Quest (Eunice) -> Devias, 195 12
* You can make the Quest in Party
  {% endhint %}

## Quest Information:

{% hint style="info" %}
**1st Mission:**\
\- Receive Extra Buff 'Damage Nuke'\
\- Eunice and some Monsters appear Together\
\- You have 1 minute to defeat Eunice\
\
**2nd Mission:**\
\- Receive Extra Buff 'Damage Bolt' after defeat Eunice\
\- Eunice and some Monsters appear Together\
\- You have 1 minute to defeat Eunice\
\
**3rd Mission:**\
\- Receive Extra Buff 'Damage Wide' after defeat Eunice\
\- Eunice and some Monsters appear Together\
\- You have 1 minute to defeat Eunice\
\
\
**Extra Mission:**\
\- Receive Extra Buff 'GIANT' after pay the tax and defeat Eunice+Giant\
\- You have to pay 300 Creations\
\- You have 1 minute to defeat Eunice+Giant
{% endhint %}

## Giant Information:

<figure><img src="https://522801306-files.gitbook.io/~/files/v0/b/gitbook-x-prod.appspot.com/o/spaces%2FWkHrPTCMsd8do1wbyrNs%2Fuploads%2FmLEm3VrodjghNHqJAvCp%2Fgiant_mount.png?alt=media&amp;token=23367d3c-9634-4c9e-a9e7-12c80b40958f" alt=""><figcaption></figcaption></figure>

{% hint style="info" %}

* The giant's color is random.
* Does not have any attributes.
* Cannot be negotiated or exchanged.
* Activate/Deactivate with the CTRL+X hotkey.
* Increases the character's movement speed.
  {% endhint %}


# Event Window

{% hint style="info" %}
**We now have a custom UI to make it easier for you to enter events and bosses. Use the Hotkeys&#x20;**<mark style="color:yellow;">**\[CTRL + T]**</mark>**&#x20;to open the window.**
{% endhint %}

<figure><img src="https://522801306-files.gitbook.io/~/files/v0/b/gitbook-x-prod.appspot.com/o/spaces%2FWkHrPTCMsd8do1wbyrNs%2Fuploads%2FHGUKBI8kia0uDzcsu674%2Fctrt.gif?alt=media&amp;token=d2610646-b443-4e0c-95ca-67edeb12e6a9" alt=""><figcaption></figcaption></figure>


# Window Invasion/Boss

## Invasion List Window:

<figure><img src="https://522801306-files.gitbook.io/~/files/v0/b/gitbook-x-prod.appspot.com/o/spaces%2FWkHrPTCMsd8do1wbyrNs%2Fuploads%2Fyk07MQy0LsynfcR0D7qg%2Fwindowinv.gif?alt=media&amp;token=0c96791f-557e-4522-9a12-71f26c7c4771" alt=""><figcaption></figcaption></figure>

{% hint style="info" %}
Just press the hotkey \[J] to open the invasion window.
{% endhint %}

## Boss List Window:

<figure><img src="https://522801306-files.gitbook.io/~/files/v0/b/gitbook-x-prod.appspot.com/o/spaces%2FWkHrPTCMsd8do1wbyrNs%2Fuploads%2FjumY9thR4NRi2dWYohQ3%2Fwindowboss.gif?alt=media&amp;token=0db00c6f-88d1-4141-83cf-4893672fc727" alt=""><figcaption></figcaption></figure>

{% hint style="info" %}
To open the bosses window, just follow the example in the GIF above.
{% endhint %}


# Seeds & Harmony

## Seeds Information:

<figure><img src="https://522801306-files.gitbook.io/~/files/v0/b/gitbook-x-prod.appspot.com/o/spaces%2FWkHrPTCMsd8do1wbyrNs%2Fuploads%2FDRYCTAjKYPU9zMF9QCf2%2Fseed.png?alt=media&amp;token=1fb3a79a-1e51-446a-af06-ab1bfd959473" alt="" width="318"><figcaption></figcaption></figure>

{% hint style="info" %}
Seeds can be obtained through Seed Capsule and their maximum level is 20.\ <br>

* <mark style="color:red;">Fire: Increase Dmg/Wiz lvl20 +35</mark>
* <mark style="color:red;">Fire: Attack Speed +50</mark>
* <mark style="color:red;">Fire: Max Attack +600</mark>
* <mark style="color:red;">Fire: Min Attack +600</mark>
* <mark style="color:red;">Fire: Attack +600</mark>
* <mark style="color:red;">Fire: AG Decrease 60%</mark>
* <mark style="color:blue;">Water: Block Rating +25%</mark>
* <mark style="color:blue;">Water: Defense +1000</mark>
* <mark style="color:blue;">Water: Shield Protection +1100%</mark>
* <mark style="color:blue;">Water: Damage Reduction +6%</mark>
* <mark style="color:blue;">Water: Damage Reflection +7%</mark>
* Ice: Life Recovery when kill monster +926
* Ice: Mana Recovery when kill monster +1419
* Ice: Skill Attack +800
* Ice: Attack Rating +222
* Ice: Durability +165%
* <mark style="color:green;">Wind: Life Auto Recovery +162</mark>
* <mark style="color:green;">Wind: Life Increase +10000</mark>
* <mark style="color:green;">Wind: Mana Increase +10000</mark>
* <mark style="color:green;">Wind: Mana Auto Recovery +2430</mark>
* <mark style="color:green;">Wind: Maximum AG +500</mark>
* <mark style="color:green;">Wind: AG Increase +500</mark>
* <mark style="color:yellow;">Light: Excellent Damage Increase +2500</mark>
* <mark style="color:yellow;">Light: Excellent Damage Rate +25%</mark>
* <mark style="color:yellow;">Light: Critical Damage Increase +2500</mark>
* <mark style="color:yellow;">Light: Critical Damage Rate +25%</mark>
* <mark style="color:orange;">Earth: Strenght Increase +500</mark>
* <mark style="color:orange;">Earth: Agility Increase +500</mark>
* <mark style="color:orange;">Earth: Vitality Increase +750</mark>
* <mark style="color:orange;">Earth: Energy Increase +500</mark>
  {% endhint %}

## Harmony Information:

<figure><img src="https://522801306-files.gitbook.io/~/files/v0/b/gitbook-x-prod.appspot.com/o/spaces%2FWkHrPTCMsd8do1wbyrNs%2Fuploads%2FWoFtimtbhF2sldMbKZck%2FHarmony.png?alt=media&amp;token=cf921c42-2b01-4950-8efd-798c4341a926" alt=""><figcaption></figcaption></figure>

{% hint style="info" %}
To create Jewel of Harmony you need to obtain the Jewel of Gemstone and transform it into Jewel of Harmony through the NPC Elpis.\
\ <mark style="color:yellow;">Weapon Option:</mark>

* Strenght Increae +300
* Agility Increase +300
* Energy Increase +300
* Attack Success Rate +500
* Attack Power Increase +200
* Critical Damage Increase +400
* Excellent Damage Increae +400
* Skill Attack +200
* Durability +30%
* SD Reduction +4%
* Convert 5% Mana to Attack Power +300

<mark style="color:yellow;">Set Option:</mark>

* Vitality Increase +200
* Defense Increase +300
* Max AG Increase +300
* Max HP Increase +2.000
* Max Mana Increase +2.000
* Automatic Life Recovery Increase +10
* Automatic Mana Increase +10
* Damage Reduction Increase +150
* Item Durability +30%
* SD Reduction +4%
* Convert 10% Mana to Life +2500
  {% endhint %}


# Personal Store Information

## Personal Store Window:

<figure><img src="https://522801306-files.gitbook.io/~/files/v0/b/gitbook-x-prod.appspot.com/o/spaces%2FWkHrPTCMsd8do1wbyrNs%2Fuploads%2FMPX3xBQfGasESNJV7env%2Fpers.png?alt=media&amp;token=b6ec1e81-1730-4639-8424-4e47ed234cf3" alt=""><figcaption></figcaption></figure>

{% hint style="info" %}
Press the \[P] hotkey to open the store window.<br>

1. **List of Private Stores**: This displays the list of all personal stores per user, each store can have multiple items for sale.
2. **Item List**: This displays the list of all items available for sale.
3. **Search**: This allows you to search for an item among all available stores.
   {% endhint %}

## Buy Item Personal Store:

{% hint style="info" %}
You can buy an item from any personal store by clicking on it. A window will open where you can check the price and the items. This can be a 'single item' or a 'bundle' of items. If it is a 'bundle', you will buy all the items. To confirm the purchase, click on 'Buy'. When you buy an item, it will be sent to your 'GREMORY CASE'.
{% endhint %}

## Sell Item Personal Store:

{% hint style="info" %}
To sell an item or a bundle of items you must access your own **'Personal Store'** and click on one of the empty slots. A window will open where you can choose if you want to sell an item or a bundle of items, the price, and add the items by **'right-clicking'** on them. When you have added all the items you want to sell, click on the **'open'** button at the bottom of your Personal store window, and if you want to **'close'** the store click on the close button. The item price can be in **Zen,Ruud,WCoin,GoblinPoints, Jewel of Bless, and Jewel of Soul**. You can modify or withdraw the item only when the store is closed. There is a tax charged to the seller, as a fee, for using the Personal Store.

* You set the value in ‘Zen’, ‘Ruud’, ‘WCoin’, ‘GoblinPoints’ and you will be charged a tax fee.
* Tax on Jewels is 3% of the total amount exchanged.
* Tax will not be applied if the exchange amount is less than 17 Jewels.
* If the amount of the exchange of Jewels is greater than 16 Jewels, at least 1 Jewel of tax is charged. When an item is sold or withdrawn, it will be sent to the GREMORY CASE.
  {% endhint %}

## Open Store Settings:

{% hint style="info" %}
**Commands to open the personal store:**

**Sell ​​items by Ruud ‣ /store ruud** \
**Sell ​​items for WCoin ‣ /store coin** \
**Sell ​​items for GoblinPoints ‣ /store gp**\ <mark style="color:red;">If you press \[Open] your items will be sold for zen</mark>
{% endhint %}


# Hunt Point System

{% hint style="info" %}
**The System works within all SubServers NOPvP channels have a lower chance of converting HUNT points than PvP channels)**

* **Each map gives 2 buffs (killing monsters)**
* **Every day you have a limit of monsters/pvp (points) to kill for free**

<mark style="color:red;">**The hunting system will be released from level 1000.**</mark>\ <mark style="color:red;">**Press the 'L' hotkey to open the Hunt Point information window.**</mark>
{% endhint %}

## Hunt Map:

{% hint style="info" %}
**Atlans Abyss 1-2-3 --> \[Elemental Damage & Elemental Defense]** \
**Scorched Canyon --> \[Elemental Damage & Elemental Defense]** \
**Crismon Icarus --> \[Excellent Damage & Critical Damage]** \
**Ardil Temple --> \[Excellent Damage & Critical Damage]** \
**Aida Gray --> \[Damage Reduction & Damage Reflect]** \
**Blaze Kethotum --> \[Damage Reduction & Damage Reflect]** \
**Kanturu Under Area --> \[Max HP & Max SD]** \
**Ignis Volcano --> \[Max HP & Max SD]** \
**Blood Tarkan --> \[Damage Decrease & Ignore Damage]** \
**Tormenta Island --> \[Damage Decrease & Ignore Damage]** \
**Twisted Karutan --> \[Double Damage & Triple Damage]** \
**Kardamahal Temple --> \[Double Damage & Triple Damage]**
{% endhint %}

## Bônus Hunt:

{% hint style="info" %}
**Elemental Damage: 50%** \
**Elemental Defense: 50%** \
**Excellent Damage: 10000** \
**Critical Damage: 10000** \
**Damage Reduction: 1000** \
**Damage Reflect: 10%** \
**Max HP: 100000** \
**Max SD: 300000** \
**Damage Decrease: 5%** \
**Ignore Damage: 8%** \
**Double Damage: 10%** \
**Triple Damage: 5% (Max Level 100 Each)**
{% endhint %}


# System Quest

{% hint style="info" %}
Access the in-game tools panel and open the quest window
{% endhint %}

<figure><img src="https://522801306-files.gitbook.io/~/files/v0/b/gitbook-x-prod.appspot.com/o/spaces%2FWkHrPTCMsd8do1wbyrNs%2Fuploads%2FjfbsJs261CBo0zYKiXCi%2Fquestsystemm.png?alt=media&amp;token=d176513c-fc21-4d81-80ef-e1ea3bcec237" alt=""><figcaption></figcaption></figure>

{% hint style="info" %}
Your current quest window will open now you have the information to complete your quest.
{% endhint %}

<figure><img src="https://522801306-files.gitbook.io/~/files/v0/b/gitbook-x-prod.appspot.com/o/spaces%2FWkHrPTCMsd8do1wbyrNs%2Fuploads%2FZfMxIH1bjAoAVnapWVd0%2Fquest2.png?alt=media&amp;token=f3b226f9-4c52-42fd-b407-d5268b26b0f6" alt=""><figcaption></figcaption></figure>

{% hint style="info" %}
Rewards are delivered automatically. You have up to 100 quests to complete on your character. The bigger the quest, the bigger the reward.
{% endhint %}


# Event List System

{% hint style="info" %}
Access the in-game tools panel and open the quest window.
{% endhint %}

<figure><img src="https://522801306-files.gitbook.io/~/files/v0/b/gitbook-x-prod.appspot.com/o/spaces%2FWkHrPTCMsd8do1wbyrNs%2Fuploads%2FCeLkl1ihqswtwPqUNuDo%2Feventlist.png?alt=media&amp;token=6417fbcf-04b7-4055-b41f-2cbbe0206e03" alt=""><figcaption></figcaption></figure>

{% hint style="info" %}
The list of all events will open and you will have information about the times of each event on the server.
{% endhint %}

<figure><img src="https://522801306-files.gitbook.io/~/files/v0/b/gitbook-x-prod.appspot.com/o/spaces%2FWkHrPTCMsd8do1wbyrNs%2Fuploads%2FzBlQJRFdlBbGTPiYl5Ng%2Fundefined%20-%20Imgur%20(6).gif?alt=media&amp;token=1c77e87b-ca2e-4722-af0b-28f7a40c45bf" alt=""><figcaption></figcaption></figure>


# DCFriend System

{% hint style="info" %}
Access the in-game tools panel and open the quest window.
{% endhint %}

<figure><img src="https://522801306-files.gitbook.io/~/files/v0/b/gitbook-x-prod.appspot.com/o/spaces%2FWkHrPTCMsd8do1wbyrNs%2Fuploads%2F7acwkIU204sfU5fSK9YO%2FScreenshot_4.png?alt=media&amp;token=19700965-629a-4c21-9f4a-71f28366ff05" alt=""><figcaption></figcaption></figure>

{% hint style="info" %}
Our Game Utils window will open, let's select the dcfriend system
{% endhint %}

<figure><img src="https://522801306-files.gitbook.io/~/files/v0/b/gitbook-x-prod.appspot.com/o/spaces%2FWkHrPTCMsd8do1wbyrNs%2Fuploads%2FhN9BkEUJH1SdHzA1uM03%2FScreenshot_5.png?alt=media&amp;token=75921ab4-d43e-44e3-a581-bf6b982574b8" alt=""><figcaption></figcaption></figure>

{% hint style="info" %}
Press the dcfriend button and the window will open. Just enter the character's nickname and game account password and the character will be disconnected after a few seconds.
{% endhint %}

<figure><img src="https://522801306-files.gitbook.io/~/files/v0/b/gitbook-x-prod.appspot.com/o/spaces%2FWkHrPTCMsd8do1wbyrNs%2Fuploads%2FLtfEvMPZJxAWDKyzHuvr%2Fundefined%20-%20Imgur%20(7).gif?alt=media&amp;token=5d254017-9ff8-4f8e-b26f-68bef5004d63" alt=""><figcaption></figcaption></figure>


# Custom Jewels

### Jewel of Excellent:

<figure><img src="https://522801306-files.gitbook.io/~/files/v0/b/gitbook-x-prod.appspot.com/o/spaces%2FWkHrPTCMsd8do1wbyrNs%2Fuploads%2F5CDk87XTZjU77BPg5egJ%2Fimage.png?alt=media&amp;token=c8fa31cf-2a9f-4dbd-91c7-f4b73c6ddcac" alt=""><figcaption></figcaption></figure>

{% hint style="info" %}

<p align="center"><strong>Jewel Excellent</strong> Set/Weapons can be used to add excellent options to your excellent items or to transform non-excellent items into excellent equipment.</p>

<p align="center">For example:</p>

<p align="center">For non-excellent equipment, you can add the Jewel +1 to transform it into excellent and receive 1 excellent option. For excellent equipment with 2 excellent options, you can use the Jewel +3 to add the third excellent option.</p>

<p align="center">You can have up to 6 excellent options on your equipment.</p>

<p align="center"><strong>Jewel Excellent</strong> can be obtained through invasions or purchased at Shop-X.</p>
{% endhint %}

### Jewel of Ancient Excellent:

<figure><img src="https://522801306-files.gitbook.io/~/files/v0/b/gitbook-x-prod.appspot.com/o/spaces%2FWkHrPTCMsd8do1wbyrNs%2Fuploads%2FYwYMOH8pSplopRQcB1OQ%2Fimage.png?alt=media&amp;token=51e9be34-acdf-4b53-a1b2-2ecacc59ed7b" alt=""><figcaption></figcaption></figure>

{% hint style="info" %}
Jewel Ancient Excellent can be used on Ancient/xAngel (Ruud) Sets to add excellent options. This jewel can only be obtained at Shop-X.
{% endhint %}

### Jewel of Luck/Skill

<figure><img src="https://522801306-files.gitbook.io/~/files/v0/b/gitbook-x-prod.appspot.com/o/spaces%2FWkHrPTCMsd8do1wbyrNs%2Fuploads%2Fzms7YYjBdQyv5kxpG8sv%2Fimage.png?alt=media&amp;token=75ed5de7-ff80-4b4a-a85e-6d5dc02c87ec" alt=""><figcaption></figcaption></figure>

{% hint style="info" %}
Jewel Lucky and Jewel Skill can be obtained through invasions or at Shop-X and can be used to add luck/skill to your equipment and wings.
{% endhint %}

### Jewel Upgrade Level Item

<figure><img src="https://522801306-files.gitbook.io/~/files/v0/b/gitbook-x-prod.appspot.com/o/spaces%2FWkHrPTCMsd8do1wbyrNs%2Fuploads%2FP13mCMD3w5CtsbanAZcs%2Fimage.png?alt=media&amp;token=80d752d4-aad2-4762-b465-01b4502107ef" alt=""><figcaption></figcaption></figure>

{% hint style="info" %}
There are Jewel Upgrades +10 +11 +12 +13 +14 +15, which are used to increase the level of your equipment. They can be obtained through invasions or Shop-X.
{% endhint %}

### Jewel of Socket

<figure><img src="https://522801306-files.gitbook.io/~/files/v0/b/gitbook-x-prod.appspot.com/o/spaces%2FWkHrPTCMsd8do1wbyrNs%2Fuploads%2FcmxGj91ra0KP3RI9rknV%2Fimage.png?alt=media&amp;token=ac788bb3-6f55-4da4-ae3e-fe4a935d75bc" alt=""><figcaption></figcaption></figure>

{% hint style="info" %}
There are 3 types of Jewel of Socket +1 +2 +3, which can only be obtained through Shop-X and are used to open slots in socketed equipment.

For example, if your equipment has 1 slot open, you should use Jewel +2 and +3.
{% endhint %}


# Guardian System

<figure><img src="https://522801306-files.gitbook.io/~/files/v0/b/gitbook-x-prod.appspot.com/o/spaces%2FWkHrPTCMsd8do1wbyrNs%2Fuploads%2FXPpktjMz3aPeqpqeIrOf%2Fimage.png?alt=media&amp;token=b819f6e8-d6e8-4064-9775-cdbc950e44ed" alt=""><figcaption></figcaption></figure>

{% hint style="info" %}
Lorencia at 123,112 there is the trainer NPC. Interact with this NPC so we can evolve our mount.
{% endhint %}

<figure><img src="https://522801306-files.gitbook.io/~/files/v0/b/gitbook-x-prod.appspot.com/o/spaces%2FWkHrPTCMsd8do1wbyrNs%2Fuploads%2FcxxcUiJr0zeKtI2IVb0j%2Fimage.png?alt=media&amp;token=96c7342b-849a-4f07-b0a4-a91574034d52" alt="" width="380"><figcaption></figcaption></figure>

{% hint style="info" %}
Let's create the Ghost Horse using Ghost Horse Seal + Fragment of Resurrection + Jewels.
{% endhint %}

### Guardian Consolidation

<figure><img src="https://522801306-files.gitbook.io/~/files/v0/b/gitbook-x-prod.appspot.com/o/spaces%2FWkHrPTCMsd8do1wbyrNs%2Fuploads%2Fr8QIiy12KP7WEZAchmQh%2Fimage.png?alt=media&amp;token=9ec0c672-ee6b-4055-9428-db44bba4749b" alt="" width="374"><figcaption></figcaption></figure>

{% hint style="info" %}
To level up your mount, you can use Guardian Upgrade Stone and Elite Guardian Upgrade Stone + Jewel of Life. Your mount can reach up to level +15, and in case of failure, it doesn't disappear; it will just lose levels and resources used in the attempt.

To evolve to the next mount, it must be at least +11.
{% endhint %}

### Guardian Upgrade

<figure><img src="https://522801306-files.gitbook.io/~/files/v0/b/gitbook-x-prod.appspot.com/o/spaces%2FWkHrPTCMsd8do1wbyrNs%2Fuploads%2F9VtERaY2rWtAT5SKyiD5%2Fimage.png?alt=media&amp;token=c08e36c9-053c-4208-937f-924656411f83" alt="" width="377"><figcaption></figcaption></figure>

{% hint style="info" %}
After leveling up our mount to +11 or above, we will upgrade to the next mount using the Seal + Jewels for this upgrade, which has a 100% chance.

With each upgrade, your mount’s options can randomly range between 1 to 4 options, and your mount can become (Rare, Normal).
{% endhint %}


# Ice Wind Valley

## **Schedule:**

{% hint style="info" %}
\~\~
{% endhint %}

### Prizes:

{% hint style="info" %}
***Ice Wind Valley  Winner = Ice Wind Valley Acess*** Exclusive Map during 1 wee&#x6B;***.***\ <br>

* 5 Erohim BOSS, with 25 Coins + 1.200 Ruud per Monster \*Respawn: 1h (Total: 2.500 Coin + 150.000 Ruud per day)
* 30 Undines, with regular drop Respawn: 3h\
  \
  **Drop list:**
* Greater Spirit Ston,Golden Sentence,Elemental Capsule,Seed Capsule,Elemental Rune,Mithril,Miracle Coin,Bless of LighGuardian Upgrade Stone,Elite Guardian Upgrade Stone
  {% endhint %}

### Register Guild:

{% hint style="info" %}
The Guild Master must use the <mark style="color:yellow;">**'/registerbattle'**</mark> command to register the guild in the event
{% endhint %}

### How to access the event:

{% hint style="info" %}
Use move to \[PvP] Ice Valley ('M' HotKey) to warp inside the Event.\ <mark style="color:red;">(</mark><mark style="color:red;">**It is only possible to play the event on channel 12)**</mark>
{% endhint %}

<figure><img src="https://522801306-files.gitbook.io/~/files/v0/b/gitbook-x-prod.appspot.com/o/spaces%2FWkHrPTCMsd8do1wbyrNs%2Fuploads%2F3niImZ6JusUtZESGYpvs%2FScreenshot_292.png?alt=media&amp;token=3f9d8340-be91-46f7-9560-112d2195e63e" alt=""><figcaption></figcaption></figure>

### How to Play:

{% hint style="info" %}
The Guild Master needs to go to a coordinate within the Ice Wind Valley (143 245). and accumulate 12 seconds to complete the seal.

* When the seal is completed, all players who are not from the defending guild will be moved to the safe zone.
* The winning guild is determined by the last guild defending the valley. Pay attention to the end of the event, the winner will be the last guild to complete the seal
* There are two ways to break the Guild Master's seal. 1- Kill the Guild Master. 2- Use skills that push the target (Lightning, Cyclone, Dark horse skill Earthshaker, Lunge) any skill that can push the target will break the seal immediately.
  {% endhint %}


# Castle Siege

## About Event:

{% hint style="info" %}
If the Guild Master leaves the throne room, is killed, or pushed, all accumulated time will reset to 0.

Each click on Seal loses 1 second. For example, if you have 30 seconds and click 3 times, you go back to 27 seconds.

The best way to stop the enemy from completing the seal or capturing the switch is to **move** the players, using Cyclone Skill (Swords), Lightning Skills (Magic), or EarthQuake Skill (DL).

**Dark Lord** is the only class that is not moved during 'Guild Master Crown Seal' when using **Dark Horse**, making it the best class to be Guild Master.

If you are the switch holder, stay as close as possible. If you are pushed, you will lose the switch and the crown will close for seals.

To win the siege, the official seal of the guild master must be registered on the pedestal located in the dragon tower (Crown). If successful, the lord of the castle will be changed.
{% endhint %}

## Guild Registration

{% hint style="info" %}
Find the Guardsman NPC located in Valley of Loren at coordinates **85, 60** to register.

Your guild must have an alliance to participate in Castle Siege.
{% endhint %}


# Arka War Event

## About Event:

{% hint style="info" %}
Arca War is a strategic PvP event that requires coordination, resilience, and teamwork to secure victory. While its core mechanics are similar to Castle Siege and Crystal Battle, it comes with its own unique rules and structure.

The main objective is to capture the tower, activate the seal, and defend it. The guild that remains in control of the tower when the event ends is declared the winner.

Minimum per guild 4 players Maximum per guild 20 players\
\
Alkmar\
Switches: (89,58), (84,30), (104,36)\
Tower: (89,41)\
Ubaid\
Switches: (175,102), (192,110), (200,96)\
Tower: (188,101
{% endhint %}

## How to Register:

{% hint style="info" %}

* Registration takes place during the week via the NPC Protector – Sir Lesnar, located in Devias (204,61) or (240,59).
* The Guild Master must select Option 7 to register the Sign of Lord (same as Castle Siege).
* Afterward, the Guild Master must confirm the registration using Option 2.
* Each guild member must also confirm their participation using Option 3.
  {% endhint %}


# Throne Conquest

## About Event:

{% hint style="info" %}
To win Event, the first guild to reach 300 accumulated seconds will be the winner.

* Guild members must protect their guild master or eliminate the enemy guild master.

Important Rules

1. Alliances do not work in this event. Your alliance can play alone against your guild.
2. Only the Guild Master can accumulate time. Members must protect the Guild Master.
3. The Guild Master needs to stand at coordinates (225, 237) inside the Throne Castle and accumulate 300 seconds to seal.
4. Use the move \[PvP] Throne of Conquest (HotKey 'M') to enter the event channel 12.

How to RegisterUse the command /regconquest to register your guild.
{% endhint %}